Working of Pong-RT
Intro
The basic logic here is that there is a small model that manages ray-tracing for each object in the scene. This approach was done to minimize training time and budget. Each model takes in the position of the paddles and ball as inputs and outputs a texture which is applied to the materials of gameobjects in Unity.
My logic was to use Blender to create the ground truth; a fully ray-traced image. Input is simply the position of paddles and ball.
Use Conv2Ds to upscale from this input to create a 256x256x3 output which is the texture applied to the materials in Unity.
First I created the simple scene in Blender with 2 paddles, ball and 4 planes. I assigned each objects with materials with different properties I wanted to show-off. Then the real work starts!
Workflow
Here's the workflow. Everything is automated with a single button click.
1) Randomize positions of paddles and ball.
2) Render the path-traced image using cycles renderer. We need the pixels of each object in rendered image as a texture.
3) Project the rendered image from view and bake. The picture below shows a baked image of the glass ball. 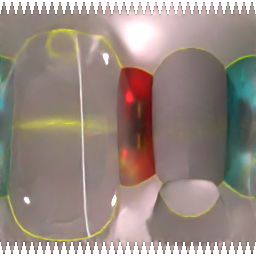
4) Save the baked texture into a folder. Also save position of paddles and ball to a csv file.
5) Repeat the above 4 steps 100000
The python files are attached to this devlog.
Now we have the inputs and outputs for training the model. I trained the networks using Pytorch locally on my RTX 3060 laptop and Kaggle.
Advantages
Training can be done locally with minimal hardware. The network is pretty small since it only needs to focus on one object.
The network also runs on low-end hardware and mobiles.
Further Improvements
I opted for this specific architecture and workflow to adapt to my budget constraints. A simple game with a small enough network that can be trained locally is nice.
However, there are lots of areas for improvement. This project limits the number of total objects we can use in the scene. This is obviously not very scalable to larger projects.
Ideally, I'd have liked to just use one model that takes in the entire frame as input and output an image that can be applied as a post-processing effect. However, that would have taken quite a bit of time and required access to more powerful GPUs.
Another approach is to split each RT effects into a different model so we can control the quality of each effect. For example, an RTGI implementation that takes quarter resolution frame as input and also outputs quarter resolution image, which is then applied as a post-processing effect on top of the rasterized image. The quality difference shouldn't be noticeable.
So there are many different approaches possible as this is game/level specific allowing for smaller models but more accurate results at the same time. I have yet to find another game or a research paper with similar ideas.
Comments
Log in with itch.io to leave a comment.
Amazing and visionary!
Thank you!